


Fish finders: What the hell am I looking at?
- Bret Whitman
- Sep 12, 2020
- 6 min read
In this blog series, I will explain how to interpret side scan and downward looking sonar to find structure and fish. This post is part 1 of a 2 in the series about your boat electronics such as fish finders, and side scan sonars.

First, why should you listen to me. To start with my career has been focused on operating underwater drones, collecting side scan data, and interpreting the data as a civilian for the US government. I am a subject matter expert (SME) on utilizing underwater drones and gathering sonar for the US military special operations community. I have analyzed thousands of hours worth of data from different underwater environments all over the world. Enough about me, lets jump right into interpreting what you are actually looking at on your sonar while trying to find places to dive or fish.
What is sonar?
Simply put, sonar stands for Sound Navigation Ranging. To further explain how sonar works, we should look at what is actually going on during the process of scanning.
So what are we looking at?
The best way to describe side scan imagery is like putting an object on the table and shining a flashlight on the object as you walk by it, see figure below. The major factors that we look at when interpreting side scan sonar are:
Size
Shape
Shadow
Sonar Return

Size
First, the size of an object within your sonar image will be determined by the range of which you have selected to display. The range will help you scale the object within the image. Be sure to set the range according to what you are looking for on the bottom or in the water column. The size of the shadow is also greatly affected by the range at where the object or fish is in relation to the boat. The further away in range, the longer or bigger the shadow will be for that object. This is due to the angle at which the sonar is hitting the fish or object. If you are looking for objects where fish might like to gather and the bottom is relatively sandy, you can usually extend your range to cover more ground due to the rather smooth bottom. Now, if you are looking in an area where the size of the fish are smaller and the bottom is cluttered with debris, you may want to decrease your range in order to see a smaller more detailed picture. This is when the lower frequencies become very useful. For fishing, knowing the size of the fish you are looking and where they might like to be in the water column is critical.
Shadow
Shadow is the most helpful factor when interpreting side scan sonar, not so with downward looking sonar. A shadow tells you if an object is in the water column, on the bottom, starting to bury, is solid like a rock or hollow like a lobster trap, how high it is from the bottom, and it also tells you the general shape of an object. In reference to finding fish, shadows will be seen completely detached from the fish reflection because they are in the water column off of the ground. Sometimes will see only a shadow of a fish and nothing else like the example below due the fish being higher in the water column.

Often times fish will accompany objects on the sea floor, and larger fish can be seen near school of bait fish which look like if a swarm of bees was underwater. If you are looking for bottom in order to locate possible areas where rockfish, halibut, lingcod or bass might be laying around, your best bet is to look for shadow that are touching or attached to an object. Where the shadow is in relation to the object determines the positioning or status of it on the sea floor. Look at the examples below. If the shadow is behind an object, it extends off of the bottom. If the shadow is in front of the object, it is scouring or possible beginning to bury. The reason why it is nice to know what the condition or state of the object is because it will help you decide how to approach diving or fishing on it. Here are some images that you might come across while searching for fish.


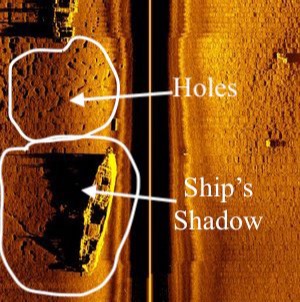


If an object is solid, the shadow will be solid black as seen in the ship shadow above. Objects that are not solid appear to have “spotty” shadows and are not solid black throughout. This can be seen above in the image of lobster pots.
Sonar Return & Shape
For downward looking sonars, size depends on a couple of different things. The first one would be the size and shape of the fish, and the other is the density of the fish or school of fish. The fish image you receive from sonar can look like (1) worms, (2) arcs, (3) big circular masses, or (4) a lot of little spots. Examples are below.
1. 2.


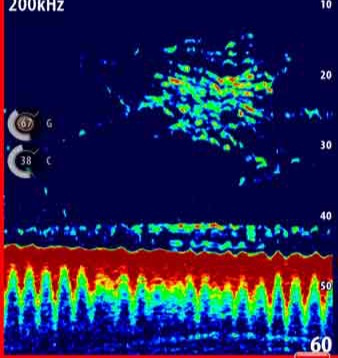
3. 4.
Big reason for this the swim bladders of the fish. A fish’s swim bladder is an organ that is filled with gas. This space provides a much different density than the surrounding water, giving it a much brighter and stronger sonar return. This is why air and metal tend to give off extreme strong returns. Both densities are very different than the density of water by itself. These spots are usually considerably brighter than the rest of the image. The sonar’s sensitivity to density is the reason why strong thermoclines or a layer of murky water can sometimes appear on your sonar as kind of a false bottom. Another good example of this would be looking at kelp on sonar. The gas filled bladders that allow kelp to float have almost a bright white return on sonar (see below).

Additionally, the fish’s overall shape affects sonar return as well. A football shaped tuna will tend to look like an arc while a white sea bass will look more like a worm due to their longer and straighter body.
The shape of the sonar return for an object can very as well depending on material, speed, depth of water and where its orientation is to the sonar transducer. Different types of material reflect varying amount of sonar energy. A shape that is metal and has a flat side facing the transducer has a really strong return and shows up well on the sonar display. However, the same shape with heavy marine growth on it will not display as brightly on the display due to the vegetation absorbing the sonar instead of reflecting it. To further explain this concept, we should look at a radar reflector use by sailboats.

The shape of it is so that there is always a flat side reflecting the radar which acts the same way that sonar does. Materials that reflect well are metals, air, rocks, and concrete. Materials that do not reflect sonar well are softwoods, fiberglass, mud, eelgrass, and other vegetation.


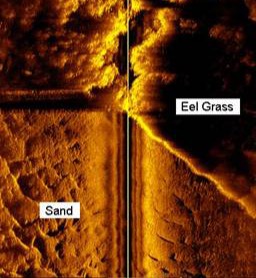
Figure 1: Rocks with strong reflection. Figure 2: A tire with strong reflection from the metal and not from the rubber in it. Figure 3: Eel grass vs sand sonar return.
As I mentioned above, density has a lot to do with this which is why using side scan for looking under kelp paddies is more like present/absent than a detailed search. In deeper water, the side scan sonar will look mostly black due to the lack objects in the water column. When kelp paddies, fish, or debris of some kind are present, you can see that some sonar pings are reflective back to the transducer and they are showing up on the sonar display. This is why I typical use side scan for checking kelp paddies and not scanning for tuna. I prefer downward looking sonar for tuna due to the greater angle optimized for depth. Also, I usually have a clue if tunas are in the general area based on reports, birds, etc. They just may be at depth where the angle of the side scan may not reach them at that depth and distance. This is just my opinion based on using my standard electronic equipment. Obviously, there are some powerful and expensive side scan sonars out there that are better than mine.