
Spearfishing Snorkels: Why Freediving Snorkels Are Different
- Bret Whitman

- Apr 26
- 11 min read
The snorkel is the most overlooked piece of gear in a freediver's bag. Most people pick one up in a dive shop bundle, never think about it again, and spend years fighting a tool that was designed for a completely different sport. Scuba snorkels, snorkel-tour snorkels, and freediving snorkels look similar from a distance, but they behave very differently when you start diving on a single breath. The wrong snorkel holds water weight, adds drag, catches on kelp, and fails at the exact moment you need it to clear cleanly on the surface.
This guide covers why freediving snorkels are built the way they are, the types you will see on the water, how to choose a mouthpiece, how to rig and clear the snorkel, which brands are worth looking at, and when you should just skip the snorkel entirely. It is written from a California spearfishing perspective, where the water is cold, the kelp is thick, and a simple piece of silicone beats every gimmick on the market.

What a Freediving Snorkel Actually Is
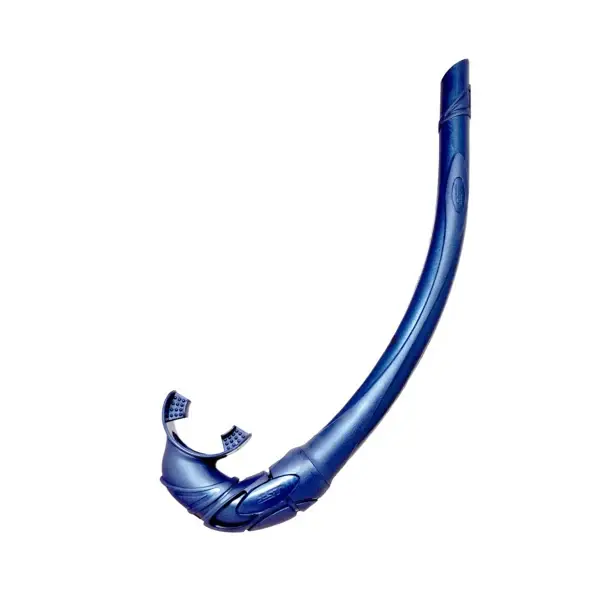
A freediving snorkel is a simple J-shaped tube with a silicone mouthpiece on one end and an open top on the other. That is the whole design. There is no valve at the top. There is no splash guard. There is no purge chamber under the mouthpiece. The tube is soft enough to flex when it hits your shoulder or a piece of kelp, and the mouthpiece is low-profile enough that you can hold it between your teeth for an hour without your jaw cramping.
Scuba snorkels, by comparison, are built around the assumption that you are on the surface for long periods of recreational snorkeling, that you do not care about drag because you are not diving to 60 feet, and that you want a valve at the top to keep waves and splashes out of your mouth. That design logic falls apart the moment you duck dive. A dry-top valve traps air in the tube and pulls upward as you descend. A purge valve holds a few cubic centimeters of water that you now drag through the water column. A rigid plastic splash guard catches flow and makes noise as you kick.
Why Simple Wins for Breath-Hold Diving
The case for a simple J-tube comes down to four practical points. First, no purge valve means nothing to leak or hold residual water weight. A purge valve sits at the low point of the mouthpiece and traps a small volume of water every time you clear. That sounds trivial, but over a four-hour dive day it means you are dealing with more saltwater than necessary and the valve membrane itself becomes a failure point that can stick open or closed.
Second, flexible silicone instead of rigid plastic means the snorkel moves with your head rather than fighting it. When you turn to track a fish, a soft tube bends and follows. A rigid tube can lever against your mask strap and tug at your seal. Third, a clean silicone tube has lower drag underwater. The difference between a streamlined J-tube and a dry-top with a splash guard is not dramatic on a single dive, but over hundreds of descents per year it adds up in wasted energy and extra noise.

Fourth, and most important, fewer failure points means the snorkel is boring. It just works. No valve to swap, no hinge to break, no spring to corrode. You rinse it, hang it up, and it lasts for years. In a sport where every added part is a part that can fail while you are breath-holding, boring equipment is a feature.
The Five Types of Snorkel You Will See on the Water
1. J-Tube (Standard Freediving Snorkel)
This is the snorkel most serious freedivers use. A classic J-shape molded out of soft silicone or a silicone-polymer blend, with a simple mouthpiece at one end and an open top at the other. Usually 14 to 16 inches long, about 3/4 inch internal diameter. The whole thing flexes enough to bend 90 degrees if you press on the middle. No moving parts. You clear it with a single blast on the surface and it is dry instantly. For most California divers, this is the right answer and you do not need to overthink it.
2. Semi-Flexible Tube

A compromise design with a slightly more rigid mid-section and flexible ends. The idea is that the rigid middle holds its shape against flow, making it quieter at speed, while the soft ends still move with your head and jaw. Some divers like this style for long approach swims where they are kicking at the surface for five or ten minutes at a time. The downside is that the rigid section can crack if you store the snorkel compressed, and the transition points between soft and rigid material are a minor weak point.
3. Purge Valve Snorkel (Scuba Style)

Not recommended for freediving. A purge valve snorkel has a one-way valve at the base of the mouthpiece, the idea being that water drains out the bottom instead of requiring you to blast it back up through the tube. On scuba it is fine because you have unlimited air and you are not breath-holding through the clear. On a breath-hold dive, the purge chamber retains water weight, adds drag, and complicates clearing. The valve can also stick, leak, or crust with salt and sand. If you already own one, it will work, but do not buy one on purpose.
4. Dry-Top Snorkel

Also not for freediving. A dry-top snorkel has a floating valve at the top that closes when the snorkel goes underwater, preventing water from entering the tube. For a surface snorkeler this is great. For a freediver it is a disaster. The sealed tube traps a column of air that wants to float upward as you descend, which means the snorkel pulls on your mask strap, tugs your head sideways, and creates drag and noise the entire dive. On ascent it can also fail to open cleanly and leave you with a snorkel full of compressed air that you still have to clear. Skip it.
5. Flex Tube (Fully Flexible)
The high-end freediving choice. A flex tube is made entirely of soft silicone with no rigid sections at all. It can be bent in any direction and springs back to shape. Flex tubes are quieter in the water because they deform rather than push against flow, and many divers find they are more comfortable on long kelp paddles. They are also easier to tuck out of the way if you want to ditch the snorkel on a descent. The tradeoff is cost and a slight tendency to flop around on the surface in chop. For experienced divers, this is often the preferred choice.
Mouthpiece: The Part That Actually Matters

The tube is the part people obsess over, but the mouthpiece is the part you actually feel every minute you are in the water. A good freediving mouthpiece is made of soft medical-grade silicone, has a low profile that does not push your lips open, and uses orthodontic bite tabs that let your jaw relax rather than clamp. If your jaw is sore after a dive day, the mouthpiece is almost always the cause.
Cheap mouthpieces are made from hard plastic or low-grade silicone that tears at the bite tabs within a season. When the tabs go, the snorkel drags on your teeth instead of resting in your bite and you end up with a sore jaw and a cracked tooth waiting to happen. Most quality freediving snorkels let you swap the mouthpiece independently of the tube, which is the single best maintenance upgrade you can do. Keep a spare mouthpiece in your gear bag and replace it the moment it starts to tear.
Attachment: Clip to the Strap, Not Through the Strap
How you attach the snorkel to your mask is a small detail that has big consequences. Threading the snorkel through a rubber snorkel keeper locked onto the mask strap is the old scuba method. It works, but it locks the snorkel in place and makes it nearly impossible to ditch or adjust mid-dive. Most freedivers use a quick-release clip that attaches to the mask strap and lets the snorkel come off with one hand.
The reason is that you often want the snorkel out of the way on the descent. A snorkel in your mouth is a small but real source of drag, it catches on kelp, and it changes how air moves in your sinuses during the pressure changes of a dive. Many divers take the snorkel out of their mouth the moment they duck dive, letting it trail on the clip, then put it back in when they surface. Some divers go further and remove the snorkel entirely on long dives because that trailing piece still creates micro-drag and micro-noise on every kick. A quick-release clip lets you do any of this without fighting your gear.
Brands Worth Looking At
The freediving snorkel market is small and well-sorted. A handful of brands have made the same proven designs for years and you will see them on every serious boat in California.
Cressi Corsica. A classic Italian J-tube snorkel in soft silicone. Cheap, durable, available everywhere, and a common first snorkel that many divers never outgrow.
Beuchat Spy. A French freediving standard, soft silicone with a comfortable low-profile mouthpiece and good flex. Popular with competitive freedivers and spearfishing clubs.
Omer Zoom. An Italian semi-flexible design with a slightly stiffer mid-section. Well balanced on the surface, quieter at speed. A common choice for divers who spend a lot of time paddling between spots.
Mares Samurai. A flexible J-tube with a comfortable mouthpiece and a reputation for holding up to cold water and rough handling. Good middle-ground pick.
Riffe. An American spearfishing brand that makes a simple, no-nonsense silicone J-tube sized for spearfishing rather than snorkeling tours. Often sold in bundles with Riffe masks.
Aqua Lung Nautilus. A well-made silicone snorkel from a big dive brand. A solid entry-level pick that is easy to find at most dive shops.
Any of these will outperform a scuba dry-top or purge snorkel for freediving. The differences between them are smaller than the difference between any of them and the wrong type of snorkel.
Clearing Technique: Blast, Do Not Blow
There are two ways to clear a snorkel. The slow-blow method, taught in scuba classes, has you breathe out slowly and steadily to push water out the top over a few seconds. The blast-clear method, which is what freedivers use, is one hard sharp exhale the instant your head breaks the surface. On a simple J-tube the blast clear works instantly because there is no valve to route air through, no chamber to fill, no splash guard to deflect.
Blast clearing matters because you want your first recovery breath after a dive to be clean. If you are still blowing water out of the tube on breath two or three, you are wasting oxygen you just spent a whole dive saving. Practice the blast in shallow water. Submerge the snorkel, surface, and punch out one hard exhale from deep in your chest. The tube should be dry in a fraction of a second.
Why Freedivers Often Skip the Snorkel
Here is a detail most scuba divers never think about. Between dives, a freediver is not floating face-down breathing through a snorkel the way a recreational snorkeler does. A freediver is floating face-up or on their side, doing structured recovery breaths, watching the sky, and setting up for the next descent. The snorkel has no role during surface intervals. Some divers keep it in their mouth out of habit. Many do not.
A number of experienced divers prefer to breathe mouth-up without a snorkel during the recovery phase and only use the snorkel during long approach swims, when they are kicking face-down on the surface and actually need it. The snorkel goes in the mouth at the dock and comes out at the float line. This is a personal choice and there is no wrong answer, but it is worth experimenting with. If you have always fought your snorkel between dives, try taking it out and see if your breathing feels more relaxed.
California Snorkel Setup
For California spearfishing, the standard setup is a simple silicone J-tube, clipped to the mask strap with a quick-release, with a comfortable orthodontic mouthpiece. There is no advantage to a dry-top in California. The water is cold but calm enough that chop is not an existential problem, and the kelp canopy is a bigger snag hazard than splash entry. A dry-top will hang up on every frond you swim past.
There is also no advantage to a purge valve. California water is full of fine sand and kelp fragments that will work their way into a purge chamber and turn it into a noisy, crusty, half-stuck mess by mid-season. A smooth J-tube rinses clean in thirty seconds. Stick with simple, match the snorkel to the conditions, and spend your gear budget on a better mask or a longer set of fins.
For current California visibility, thermocline, and swell conditions before your next dive, check conditions.spearfactor.com.
Common Mistakes
Buying a scuba dry-top snorkel for freediving is the most common mistake, usually because a dive shop employee who has never breath-hold dived sold it to a new diver as an upgrade. It is not an upgrade for freediving. It is the wrong tool. Return it and buy a simple J-tube.
Buying a cheap rigid plastic snorkel is the second common mistake. Rigid plastic cracks in cold California water, especially after a few seasons of UV exposure in the back of a truck. When a plastic snorkel cracks it usually splits near the base of the mouthpiece, where you cannot see it, and then quietly fills with water on every dive until you figure out what is happening. Silicone is worth the extra money.
Over-long tubes are the third mistake. A snorkel that is 18 or 20 inches long, often marketed as a tour snorkel for deep wave clearance, increases dead air volume. Dead air is the stale breath that sits in the tube between exhale and inhale. More dead air means your first inhale is partly CO2-rich air you just breathed out, and for a breath-hold diver who is already pushing CO2 tolerance, that is wasted oxygen. A 14 to 16 inch tube is plenty.
Leaving the snorkel loose on the mask strap is the fourth mistake and the most painful. A loose snorkel swings on every kick, catches every piece of kelp you swim past, and eventually yanks on your mask strap at the worst possible moment. Use a quick-release clip that is snug but not locked, so the snorkel sits against your head when you are swimming and comes off cleanly when you want it to.
Maintenance
Snorkel maintenance is almost nothing, which is part of the appeal. Rinse in fresh water after every dive day, paying attention to the inside of the tube and the mouthpiece. Let it dry fully before storing. Do not leave it in direct sun for days on end, especially on a hot dashboard. UV and heat degrade silicone faster than salt water ever will.
Check the mouthpiece every few trips for tears at the bite tabs or hard spots where the silicone has gone stiff. Replace the mouthpiece the moment you see damage. A torn mouthpiece will leak and a hard mouthpiece will bruise your gums. Both problems vanish with a ten-dollar replacement. Check the base of the tube where it meets the mouthpiece for cracks or looseness. If the connection is loose, do not try to glue it, buy a new snorkel. At freediving snorkel prices, replacement is cheap insurance.
Bottom Line
A freediving snorkel is a simple silicone J-tube. That is it. No purge, no dry-top, no splash guard, no gimmicks. Soft silicone, orthodontic mouthpiece, quick-release clip to the mask strap, 14 to 16 inches long. Learn to blast clear on the surface. Take the snorkel out of your mouth between dives if that feels better. Treat the snorkel as a boring piece of gear that should never get in your way, and it will not.
Any of the brands above, picked in the right type, will do the job for a California diver for many seasons. The snorkel is not where you want to spend a thousand dollars or six hours of research. Buy a proven J-tube from a proven brand, set it up correctly, and forget about it.
Always dive with a buddy, know your limits, and train your breath-hold on land before pushing depth. For freediving safety fundamentals and buddy protocols, see freedivingsafety.com.
Photo credits: Snorkel and mouthpiece picture is provided by Neptonics. Please go see Neptonics at www.neptonics.com for your gear.


Comments